🌸 Introduction: Embracing Spring with Blooming Flower Nails
Spring is a season of renewal, and what better way to celebrate than by adorning your nails with blooming floral designs? In 2025, floral nail art has evolved, offering a fresh take that combines timeless elegance with modern trends. From delicate daisies to vibrant wildflowers, these designs bring a touch of nature’s beauty to your fingertips.
🌼 Core Concepts: Understanding Blooming Flower Nails
What Are Blooming Flower Nails?
Blooming flower nails are a form of nail art that incorporates floral designs, often using techniques like blooming gel to create soft, watercolor-like petals. These designs can range from subtle accents to full floral patterns, offering versatility for various preferences.
Why Choose Floral Nail Art in 2025?
Floral nail art in 2025 is characterized by its blend of classic motifs and contemporary styles. Trends include pastel palettes, 3D elements, and the use of blooming gels to achieve intricate designs. This fusion allows for personalized and expressive manicures that resonate with the season’s spirit.
💅 Practical Applications: Incorporating Floral Designs
Everyday Elegance
For daily wear, subtle floral accents on neutral bases can add a touch of sophistication without being overpowering. Think of a soft pink base with tiny white daisies delicately placed near the cuticles.
Special Occasions
For events like weddings or parties, bold floral designs with vibrant colors and 3D elements can make a statement. Imagine a rich red base adorned with gold-accented roses or a gradient of purple hues transitioning into lavender blooms.
DIY at Home
With the right tools and a bit of practice, creating blooming flower nails at home is achievable. Utilize blooming gels, dotting tools, and fine brushes to craft your desired floral patterns.
🛠️ Step-by-Step Tutorial: Creating Blooming Flower Nails
- Preparation: Begin by cleaning and shaping your nails. Apply a base coat to protect the natural nail.
- Base Color: Choose a pastel or neutral shade as your base. Apply two coats for an even finish.
- Blooming Gel Application: While the base color is still tacky, apply blooming gel in the desired floral pattern. The gel will spread, creating a soft, blooming effect.
- Detailing: Once the blooming gel has set, use a fine brush to add details like leaves or additional petals.
- Top Coat: Seal the design with a top coat to add shine and longevity.
- Finishing Touches: Allow the nails to dry completely. For added flair, consider adding rhinestones or glitter accents.
Absolutely! Here are 20 Blooming Flower Tips A Fresh Take on Spring Nails, each explained in detail to inspire your next manicure:
20 Blooming Flower Tips For Spring Nails
1. Watercolor Florals: Soft and Dreamy
Achieve an ethereal look by blending pastel hues like lavender, mint, and blush pink using a watercolor technique. Apply a sheer base coat, then gently dab diluted nail polish with a sponge or brush to create soft, flowing floral patterns. This style offers a delicate and romantic touch, perfect for spring occasions.
2. Bold Neon Blossoms: Vibrant and Eye-Catching
For a daring look, opt for neon shades such as electric pink, lime green, or bright orange against a stark white or black base. Paint oversized flowers with bold outlines to make a statement. This design is ideal for those who love to stand out and embrace vibrant colors.
3. Vintage Roses: Timeless Elegance
Channel a classic vibe with soft pastel roses on a neutral or nude base. Incorporate intricate details like delicate leaves and subtle shading to enhance the vintage feel. This design exudes sophistication and is perfect for formal events or a refined everyday look.
4. Tropical Hibiscus: Exotic and Bold
Bring the tropics to your fingertips with vibrant red or pink hibiscus flowers on a nude or coral base. Add green leaves and subtle shading to create depth and realism. This design is perfect for summer vacations or adding a touch of exotic flair to your style.
5. Minimalist Daisies: Simple and Chic
Create small, delicate white daisies with a yellow center on a nude or pastel base. Use a dotting tool for precision and arrange the flowers asymmetrically for a modern twist. This minimalist design is versatile and suitable for both casual and formal occasions.
6. 3D Floral Accents: Textured and Unique
Add dimension to your floral designs by incorporating 3D elements such as raised petals, rhinestones, or beads. Use acrylic or gel to sculpt the flowers, and strategically place accents to enhance the overall design. This technique adds a luxurious and eye-catching element to your nails.
7. Floral French Tips: Elegant and Subtle
Elevate the classic French manicure by replacing the traditional white tips with small floral designs in soft colors. Use a fine brush to paint tiny flowers at the tips of your nails, maintaining a clean and elegant look. This design is perfect for those who appreciate understated beauty.
8. Abstract Blooms: Artistic and Modern
Break away from traditional floral patterns by creating abstract flower shapes using bold lines and geometric forms. Experiment with contrasting colors and asymmetrical designs to achieve a contemporary and artistic look. This style is ideal for those who appreciate avant-garde aesthetics.
9. Wildflower Mix: Eclectic and Whimsical
Combine various wildflowers like poppies, daisies, and lavender on a neutral or pastel base. Use different techniques such as dotting, freehand painting, and stamping to create a diverse and playful design. This eclectic style captures the essence of a blooming meadow.
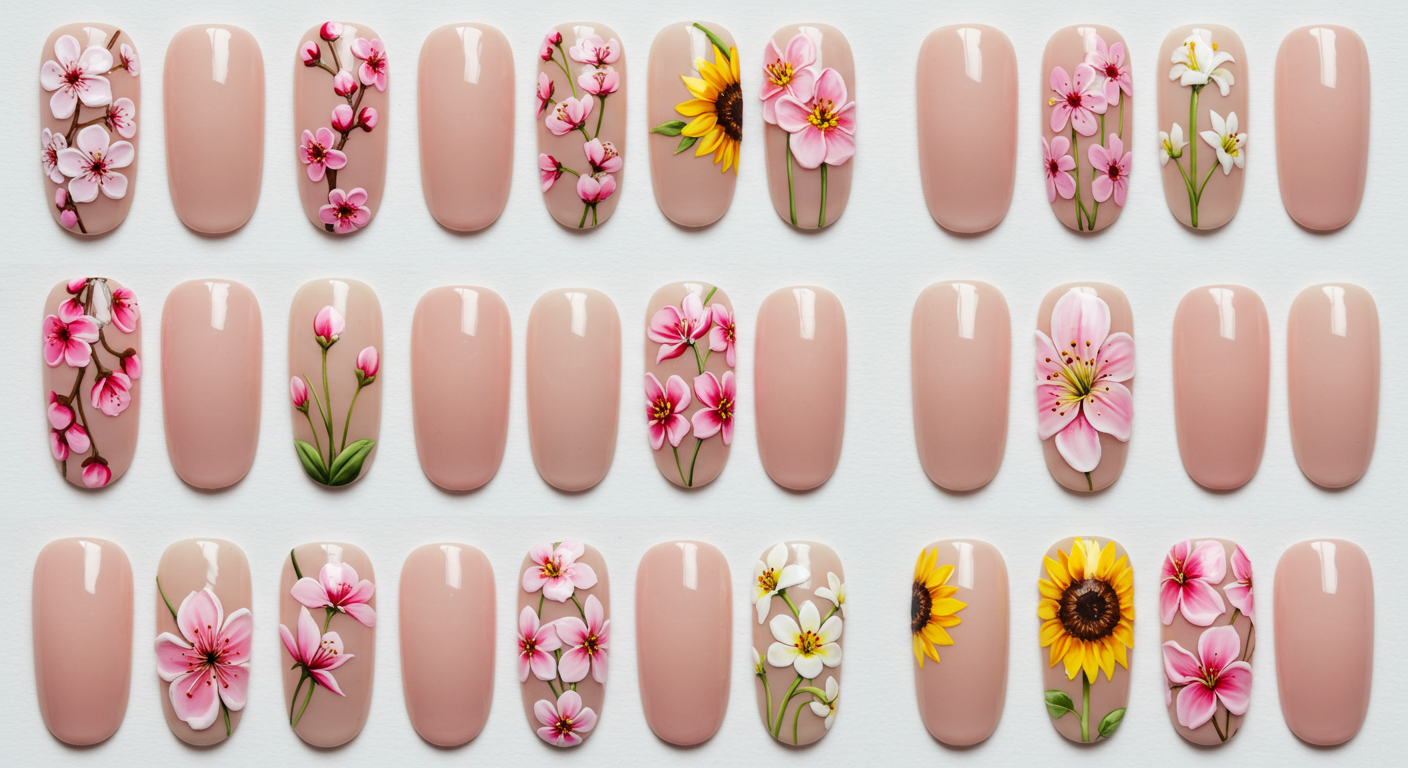
10. Cherry Blossom Serenity: Soft and Feminine
Emulate the delicate beauty of cherry blossoms with soft pink petals on a pale gray or beige base. Add subtle branches and buds to enhance the serene and feminine aesthetic. This design is perfect for springtime events or adding a touch of elegance to your everyday look.
11. Sunflower Delight: Bright and Cheerful
Capture the warmth of summer with vibrant yellow sunflowers on a blue or white base. Use a dotting tool to create the petals and add green leaves for contrast. This cheerful design brings a burst of sunshine to your nails.
12. Monochrome Magic: Cohesive and Stylish
Choose a single color palette, such as all white daisies on a mint green background, to create a cohesive and stylish design. This minimalist approach is both chic and easy to achieve, making it suitable for any occasion.
13. Glittering Petals: Sparkly and Glamorous
Add a touch of sparkle to your floral designs by incorporating glitter or shimmer into the petals or background. Use fine glitter for a subtle effect or chunky glitter for a bold statement. This glamorous design is perfect for evening events or when you want to add some sparkle to your day.
14. Negative Space Florals: Modern and Edgy
Create floral designs that utilize negative space by painting flowers with gaps or leaving parts of the nail exposed. This modern approach adds an edgy and artistic flair to your nails. Pair with a matte topcoat for a contemporary finish.
15. Gradient Blooms: Smooth and Flowing
Achieve a gradient effect by blending different shades of the same color, such as light to dark pink, within the floral design. Use a sponge or brush to create a smooth transition between colors. This technique adds depth and dimension to your nails.
16. Metallic Accents: Bold and Luxe
Incorporate metallic elements like gold or silver into your floral designs by outlining petals or adding accents to the center of flowers. This adds a touch of luxury and sophistication to your nails. Pair with a neutral base to let the metallic accents stand out.
17. Butterfly Blooms: Whimsical and Playful
Combine floral designs with butterfly motifs to create a whimsical and playful manicure. Paint delicate butterflies fluttering among the flowers for a charming and enchanting look. This design is perfect for springtime and adds a touch of fantasy to your nails.
18. Clear Nail Accents: Subtle and Elegant
Leave the base of your nails clear and focus on painting small floral designs near the tips or cuticles. This subtle approach adds elegance without overwhelming the nails. Use fine brushes and soft colors for a refined finish.
19. Ombre Florals: Smooth and Gradient
Create an ombre effect by blending two or more colors within the floral design, such as transitioning from pink to purple. Use a sponge or brush to achieve a seamless gradient. This technique adds a dynamic and artistic flair to your nails.
20. Crystal-Embellished Blooms: Sparkly and Elegant
Enhance your floral designs by adding small crystals or rhinestones to the center of flowers or along the edges. This adds sparkle and dimension, making your manicure stand out. Use a clear topcoat to secure the embellishments and ensure longevity.
📊 Case Studies: Popular Floral Nail Designs
1. Cherry Blossom Elegance
Inspired by the delicate cherry blossoms of spring, this design features soft pink petals on a white base. The subtle gradient effect adds depth and dimension.
2. Lavender Dreams
Soft lavender flowers on a nude base evoke a sense of calm and serenity. This minimalist approach is ideal for those seeking understated elegance.
🧰 Tools & Resources: Essentials for Floral Nail Art
- Blooming Gel: A special gel that spreads to create a blooming effect, essential for this nail art style.
- Dotting Tools: Used to create uniform dots for petals and other design elements.
- Fine Brushes: Ideal for detailing and adding intricate designs.
- Top Coat: Seals the design and adds shine.
- UV/LED Lamp: Cures the gel products for long-lasting results.
⚠️ Challenges & Solutions
Challenge: Achieving the perfect blooming effect with gel.
Solution: Ensure the base color is slightly tacky when applying the blooming gel. This allows the gel to spread evenly.
Challenge: Maintaining the design’s longevity.
Solution: Apply a high-quality top coat and avoid exposing nails to harsh chemicals or excessive moisture.
🔮 Future Trends: What’s Next in Floral Nail Art
As we move further into 2025, expect to see more integration of technology in nail art. Augmented reality (AR) apps may allow users to visualize floral designs on their nails before application. Additionally, sustainable and eco-friendly nail products are gaining popularity, aligning with the growing trend of conscious beauty.
❓ FAQs
Q1: How long do blooming flower nails last?
A1: With proper application and care, blooming flower nails can last up to two weeks.
Q2: Can I create blooming flower nails without a UV lamp?
A2: While a UV lamp is recommended for curing gel products, some blooming gels are designed for air-dry application. Always check the product instructions.
Q3: Are blooming flower nails suitable for short nails?
A3: Absolutely! Floral designs can be adapted to suit any nail length, including short nails.
📌 Conclusion: Bloom into Spring with Floral Elegance
Floral nail art offers a delightful way to embrace the beauty of spring. Whether you opt for subtle accents or bold designs, blooming flower nails add a touch of nature’s elegance to your style. With the right tools and techniques, you can create stunning floral designs that are both fashionable and expressive.